With versions 12 and 13, Umbraco have introduced a Content Delivery API. These API features introduce first-classsupport for modern front end frameworks. Umbraco’s documentation currently covers the V12 version of the Delivery API. Umbraco version 13 introduced a new second API definition.
Some hints and tips to get started are outlined below.
1. Enabling the Umbraco Delivery API
In Umbraco V13, Delivery Api is configured by default, but disabled via your site’s `appsettings.json` config file.
- In `appsettings.json`, set Umbraco -> CMS -> DeliveryApi -> Enabled: true
- Restart the site
- Navigate to {your_site_url}/umbraco/swagger/index.html?urls.primaryName=Umbraco%20Delivery%20API to view your site’s swagger document
The swagger endpoint will only open in non-production environments. To test against a production instance, navigate to {your_site_url}/umbraco/delivery/api/v2/content/item/:path.
"Umbraco": {
  "CMS": {
    "DeliveryApi": {
      "Enabled": true,    // enables the DeliveryApi
    },
 }
}
The Api is now publicly available. This may not be what you intend. Restricting access is covered in the next section.
2. Restrict Access by Api Key
Limit access to your Umbraco Delivery Api with an API Key:
- Open your `appsettings.json` file
- Update the `DeliveryApi` node to include `PublicAccess: false` and `ApiKey: “YOUR_API_KEY_HERE”`
Visiting /umbraco/delivery/api/v2/content/item/:path should now return a `401: Unauthorized` error.
"Umbraco": {
  "CMS": {
    "DeliveryApi": {
      "Enabled": true,    // enables the DeliveryApi
      "PublicAccess": false,   // Restricts access by ApiKey
      "ApiKey": "YOUR_API_KEY_HERE",     // The required ApiKey
    },
  }
}
3. Importing Umbraco Delivery API into Postman
The Umbraco Delivery API uses an OpenAPI definition. In development mode, you can view a human-readable version of this at /umbraco/swagger/index.html?urls.primaryName=Umbraco%20Delivery%20API . A machine-readable version, useful for importing to Postman, is available at /umbraco/swagger/delivery/swagger.json. To import the definition to Postman:
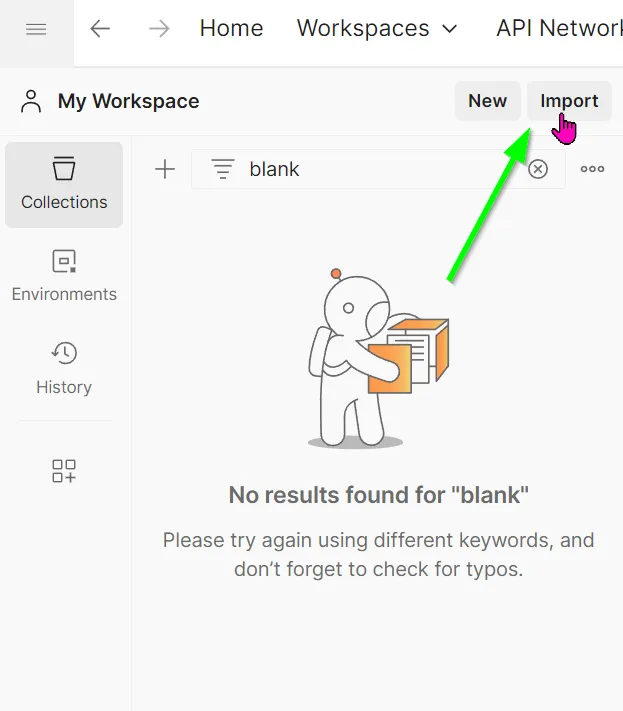
- At the top of the left-hand menu, select Import (see fig 3.1)
- Paste the URL /umbraco/swagger/delivery/swagger.json
- Wait for Postman to read your collection
- From the popout window, select Postman Collection
- Select Collections in the left-hand menu, then select the newly imported collection Umbraco Delivery API
The imported collection includes both V1 and V2 of the API. V1 is obsolete, so unless you’re specifically using that API, delete it form Postman to avoid confusion.
4. Add your ApiKey to all postman requests
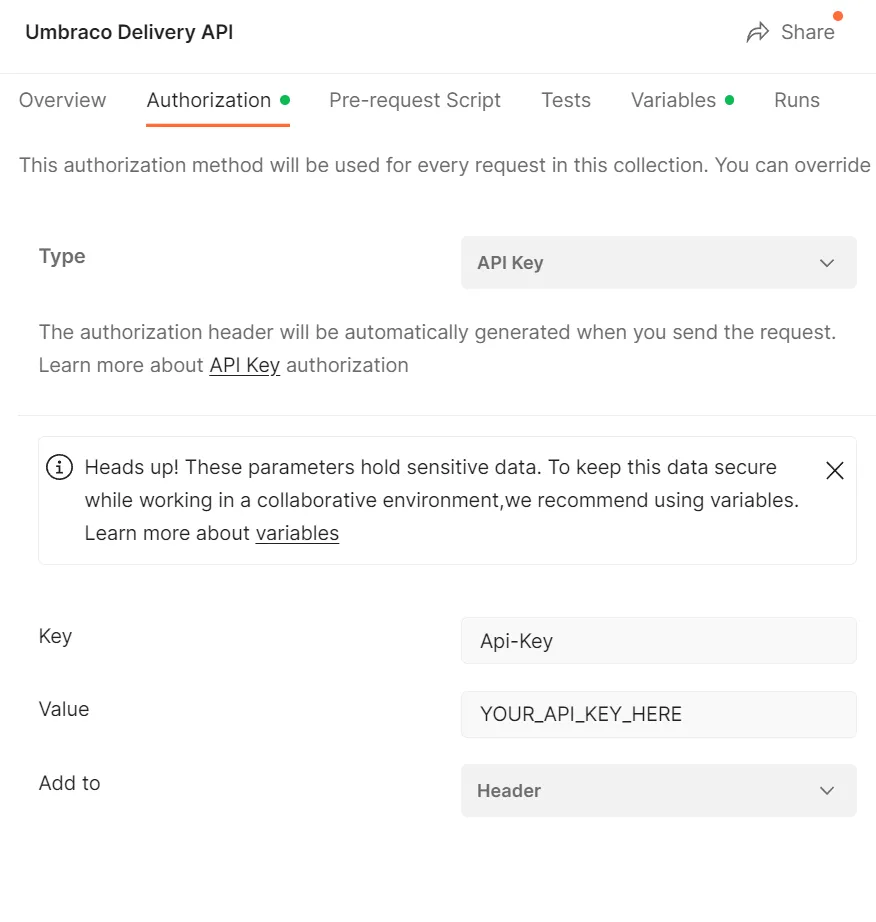
Manually adding the Api Key header to each request is cumbersome. Postman offers a collection-wide Authorization editor to make this less of a pain.
- Select your imported collection in postman
- Click Authorization from the horizontal collection menu
- Select Type
- Select API Key
- In the Key section, enter `Api-Key`
- In the Value enter `YOUR_API_KEY_HERE`
- Note that this entry supports Postman Environment Variables, which you should use for convenience, maintainability, and security. Learn more about Postman Env Variables
- In the select menu Add to, select Header
- Press `ctrl+s` to save the collection
5. Add default settings to all postman requests
Umbraco’s Delivery API allows you to customise your requests to include special Umbraco features. For example, in a multi-site environment, restricting your request to a Start-Item. Similarly, you can toggle Preview mode on and off.
In Postman, these can be configured across the entire collection, using Pre-Request Scripts.
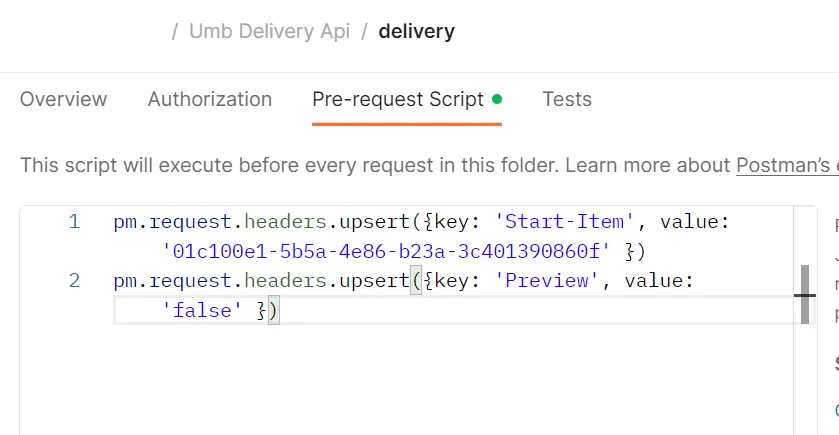
- From the left hand menu, select your collection
- Select the top Umbraco Delivery API folder
- From the horizontal menu, select Pre-request Script
- To configure a start node, enter `pm.request.headers.upsert({key:
‘Start-Item’, value: ‘01c100e1-5b5a-4e86-b23a-3c401390860f’ })`
- This will restrict all Delivery API content requests to a descendants of the specific node (01c100e1-5b5a-4e86-b23a-3c401390860f in my case)
- To configure Preview Mode for all requests,
`pm.request.headers.upsert({key: ‘Preview’, value: ‘true’ })`
- This will configure Delivery Api requests made from Postman to use Preview mode
- Disable preview mode by setting `value: ‘false’`
- Press `ctrl+s` to save the pre-request settings
pm.request.headers.upsert({key: 'Start-Item', value: '01c100e1-5b5a-4e86-b23a-3c401390860f' })
pm.request.headers.upsert({key: 'Preview', value: 'true' })
You should now be set up to use the Umbraco Delivery Api in Postman.